Showing posts with label DIY. Show all posts

Craftistas DIY Kit

A couple of weeks ago I received an email from Camille, the genius behind Craftistas, asking me to test a DIY kit. Of course I said yes! 
What is Craftistas? Well, its a monthly subscription craft kit. They send you the supplies and you make it! Here's what my kit looked like. 


Due to my impending move I wasn't able to work on the kit right away, but it was well worth the wait! I had a wonderful time creating my very own version of a fringe necklace! Take a look!
Love how easy it was to personalize the piece. Because my style is a little bit more feminine than edgy, I added a strip of pretty lace. Overall, the project took no longer than 30 minutes, and was super fun! Thanks Craftistas!

Carli

DIY: Fabric Chain Garland

 When I saw THIS fabric chain garland post by Bekuh at Secondhand Sundays I knew that I had to make one. I was originally planning on making a chain garland for my new apartment that I am moving into in a couple weeks, and while I still may do that, I decided to make one now in honor of the United States olympic team. Last night we had an Olympics opening ceremony party complete with Oreos, guacamole, mini American flags to wave around, lots of patriotism, and this garland! It was so much fun! By the way... did anyone else not get what was going on in the opening ceremonies? Maybe it was the copious amounts of jokes made it impossible to hear what the commentators were saying, but I didn't get it at all. So if you would like to clue me in... that'd be nice.

The garland was so simple to make! and very fun. It took me about 20 minutes to put all the links together. My chain wasn't very long (I only used 1/4 yard of fabric). If you want to make it check out Bekuh's how-to. I am sure she'd love it if you stopped by. She has such a lovely blog!

GO USA!

Carli

DIY: Olympic/Patriotic Brooch

The Olympics started today! I am so excited to watch the opening ceremonies with my friends tonight. My Canadian friend Ashely has been watching it and she keeps giving me little hints. She said that Voldemort makes an appearance. I am not sure if thats some sort of joke, or if it is for real... I guess i'll have to wait to find out! 

I am a big fan of crafting/dressing for awesome things (Christmas, 4th of July, the Olympics, Halloween, etc.) Since I am completely overzealous about the good ole USA, I thought I would show my patriotism today. Basically I want Team USA to win all of the gold medals. All of them. Since my heart is so full of love for my country I decided to make an American flag brooch to wear today. You can make one too!
You will need: Small wooden heart, red white and blue paint, small paint brush, glue gun, brooch pin, good music.
 The entire process is very simple. I made a bunch of these for my friends and it took me a couple hours just because you have to wait for the paint to dry before the next step.
I found this shirt at Goodwill yesterday and immediately knew when to wear it. Nothing is more patriotic than red white and blue stripes. Nothing. 

Go Team USA!

Carli

Recipes for Dummies: Strawberry Rhubarb Pie

Last week I posted about how I made this awesome pie (see photo above) and a few people asked me for the recipe. So here it is!

Disclaimer: I am a terrible cook (hence the post title). I mess up just about everything I make. I've never made a perfect box brownie. I don't really know cooking lingo and I don't know if there is even cooking lingo. The recipe came directly from my mom who is an amazing cook. I have a feeling that she simplified this recipe for me. So you are welcome to do it better than I. Actually, please do it better than I.

You need: 
1 bag of frozen strawberries
1 bag of frozen rhubarb
2 ready pie crusts 
1 1/2 cups of sugar
1/4 teaspoon of nutmeg
1/4 teaspoon of salt
1 handful of flour

You could also use fresh strawberry and rhubarb (if you can find it) and I bet it will taste a lot better. So do that.

First: Let your strawberries, rhubarb, and pie crust thaw.
Second: Combine strawberries, rhubarb, sugar, salt, and nutmeg into a large bowl. Mix well. Let it sit for 20 minutes.
Third: While you wait for the filling to become all juicy and stuff, take one of the pie crusts off of the pie pan and roll it out flat for the top crust. Use flour to keep it from sticking to everything. If you want, you can cut out little shapes. The first time I used a baby heart cookie cutter, this time I just cut out eyelets with a knife. This is where you can get creative!
Fourth: Once your fruit concoction has caramelized, or whatever, fill your pie! Try to leave out as much of the juice as possible.
(see bellow)
Fifth: Put the top crust on top of the filled pie. Tuck the edges under the bottom crust. Use a fork to smush them together.
Sixth: Using a cooking brush, paint a little bit of milk onto the top crust and then sprinkle with sugar. 
Seventh: Bake for 30-40 minutes. I found that the crust started to get a little too brown before the rest of the pie was done cooking so my mom told me to wrap some tin foil around the edges to block out heat. 
Eighth: Take your pie out of the oven and let it cool! The eat it! 
I am not a big fan of hot fruit, meaning that I only like cold pies. So I stuck mine in the refrigerator for an hour. The filling is usually kind of runny (as you can see in the photo above). My mom said that it is probably because I used frozen fruit. I have found that refrigerating the pie helps to thicken the filling.

I hope that you get what I am trying to say. If you are a better cook than me (which is not unlikely) please give me some pointers! Or if you have any questions feel free to ask and I'll try my  best to answer. If you end up using this recipe please let me know how it went for you!

Carli

DIY: Safety Pin Brooch

A few years ago my bestie Kaitlyn gave me a bunch of random charms on a chain. She was preparing to move to Hawaii (jealous) so she needed to do some downsizing. Being the craft hoarder that I am, I took them home with me. They had been sitting in a box of junk until the beginning of this year. Since I don't naturally gravitate towards wearing necklaces I spent a lot of time thinking about what I could do with them. I came up with the following.
The project took me a total of maybe two minutes? It is so simple. If you don't have pliers you can do it by hand, but it might be a little harder but not impossible. 
As you might have noticed, the past few pictures are not recent. No my hair has not miraculously grown back no matter how much I wish it would. I actually took pictures to for this DIY project back in January but then decided that I didn't like them (the lighting in may last apartment was terrible and it was too cold to do it outside) and then forgot about it entirely. Story of my life... Then I found the brooch I made and decided to re-photograph and share. 

If you try this out please let me know! I'd love to see how it turns out for you!
Carli

Restyle Files: T-shirt

Ok so I have a confession. I often go thrift shopping and buy clothing that I need to alter before I can wear it. Then I don't alter it. Like ever. It's terrible. I have a very large tote full of potential. One of my goals for the summer was to alter all of the clothing in my tote before school starts in the fall, but it really hasn't happened yet. So today I thought I would try my hand at a simple restyle.

I got this t-shirt a few weeks ago at Goodwill for 2 bucks. I am not sure why I bought it, especially since it was a little too small for my chest. Unfortunately, I am well endowed, and this is a reoccurring problem.

To fix this problem I, (1.) cut the side seam all the way up, (2.) cut out two rectangles of cute fabric that is about an inch and a half longer than the side seam, (3.) sew in the rectangle, (4.) hem it, (5.) do a better job than I did. 

So if you didn't at all understand that description... well I wouldn't be surprised. I had a very hard time trying to describe the process because I know little about sewing. I don't know if my sewing machine is messed up or if I wasn't doing something right, because I had some troubles. This is why half of me wants to wait until I start taking my sewing classes to restyle all of these clothes so that I do a good job, but the other half of me wants to have a whole new wardrobe before I go back to school. I think I'll ask my amazing mother for some help. With her expert hand in sewing, i'll be well on my way to a full closet this fall.

Carli


DIY: Wall Art

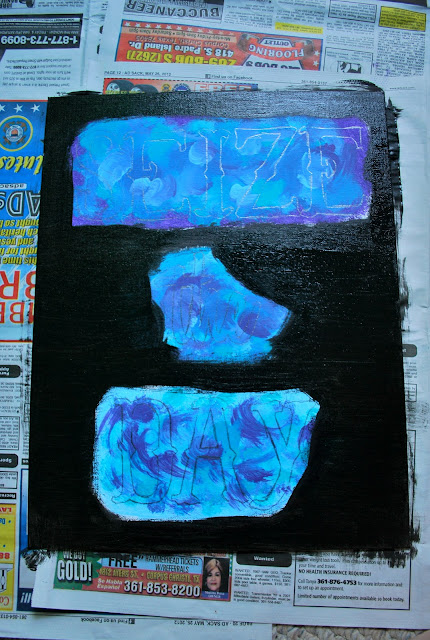
This coming fall I am going to be rooming with an amazing girl and yesterday was her birthday! We have been talking a lot about all the amazing things we are going to do and getting very excited about decorating our apartment! A couple weeks ago she, and another friend, made me a yummy cake for my birthday and since I can't bake anything... I decided to make her some room decor! She is such a sweet girl and last month when I was feeling really unsure about my future she said something that really stuck with me (you can read about this HERE). She said "Carpe Diem. Seize the Day!" So I made her this:
You will need: Canvas board (I got a set of three at Walmart on sale!), pencil, scissors, a variety of paintbrushes (I used an angled brush for most of it, but used a really small brush for the tight corners), paint (black and any other colors you want), something to pour your paint on, cup of water, print out of lettering (you can freehand it, or use stencils), and some good jams. 

Lay your words on the board to see where you want them.

Circle the areas that your words will be in.

Pour your paint.

Go crazy with the paint! This was the funnest part.

Cut out the letters while you wait for the paint to dry. Lay them on the canvas.

Trace them with a pencil.

Paint everything but the inside of the letters black and you should get something like....

This! I also added a scalloped border to mine because I thought that the edges needed a little something. 
The entire project took me about 3-4 hours. Painting around the letters was a little difficult so using a stencil might be a million times easier, but I enjoyed the process. I am looking forward to making another one for myself with maybe a Beatles quote on it! 

Also this project was inspired by THIS from A Beautiful Mess. I have searched for a long time trying to find a painting that was not too pretty to paint over and just colorful enough to let show through the lettering and have failed so far... so I thought why not create my own! 

If you try this out I would love to know how it went and see some pictures too! Good luck!
Carli

DIY: Stickers

Was anyone out there as obsessed with Lisa Frank stickers as I? I had books and books full of them! There was one period in my life when I would put Lisa Frank stickers in secret places around my house, the park, and even at school. So secret that I don't know where most of them are today. I seriously went on a search one time and found a couple. I wonder if my parents have ever noticed... sorry mom. The point is that stickers are the bomb! Unfortunately, these days I don't particularly gravitate towards psychedelic ponies and hearts. I have found that it can be really hard to find the "perfect" sticker. Am I right??! Well you don't have to search anymore... you can make one!!


 You will need: Scissors, clear transparent contact paper (I got mine at Walmart), sharpies, scotch tape (not pictured), and a printout of the picture you want to make into a sticker.

Step 1: Cut out your picture and a piece of contact paper. 

Step 2: Tape your picture to the back side of the contact paper.

Step 3: Trace the picture.

Step 4: Once you are done tracing, cut out the sticker and it should look something like...
Step 5: Your sticker is done! Now stick it somewhere wont ya?!


I made my sticker to be of a vintage microphone and some lyrics from one of my favorite Coconut Records songs (Microphone. (look it up!)) to put on my music journal. I have made stickers for several different things like my school binder, notepads, guitar case, drawing pad, and laptop (bellow)... I have been really wanting to try putting one on my car (the inside of the window), and on a mirror.


Also, have you ever been completely jealous of a person for having the absolute coolest laptop decal ever? I envy a girl that was in my English class a couple semesters ago because she had a decal of The Giving Tree. So much jealousy. I almost stole her laptop. Thats when I first made my own sticker. I made the phonograph, put it on my laptop, and made the whole world jealous. I have had it on my laptop for almost a year now and it hasn't even started to come off. The marker faded a little bit so I went over it again this morning and it's just like new! I have put stickers on several different surfaces and have never had a problem with them staying on, and they have always come off clean which I think is the most glorious thing about these stickers. 

I should point out that if you are more awesome then me, you could make your own drawing into a sticker! 

If you try this DIY out please send me a picture! I'd love to see what you create!

Carli