Showing posts with label Gimp Tutorial. Show all posts

GIMP How-To: Simple Blog Button

Promoting your blog can be a little stressful at times. Being a new blogger myself, I am always trying to find new ways to grow my readership and blogger relationships. The blogging community is a fantastic place to make friends, business relationships, support, and to share creativity... but you probably know that. I have had my blog for a little over a year now, and just recently decided to get myself out there. There is no doubt that beautiful aesthetics attract the eye. When looking for new blogs to read, I often find myself gravitating towards blogs with a clean layout, crisp design, and great photographs before I even read the content. One of the ways I look for new blogs is by clicking the sponsor buttons on my favorite blogs. I often click on buttons that are clear and crisp, aesthetically pleasing, and interesting.

Within the past couple months I have started to participate in button swaps. I have had some success and some failures in creating buttons that fit my criteria. Here are a few things to look for when making a button:

1. Don't let your button get lost in the crowd. This happened on my first buttons swap. I sent off my button and got an email back saying that she had put it up on her site. I was so excited that I immediately went to her site to see it. I couldn't find it! I must have looked up and down the column five or six times before I finally found it smack dab in the middle.

2. Keep it simple. In the button world, less is more! Buttons are very tiny, if you put too much on it people won't know what is going on!

3. Make it interesting. It's almost like a miniature work of art!

4. Make it you. I don't know how many times I have clicked on a button and it have nothing to do with the blog at all. Make sure that your button matches your content, which should match you.

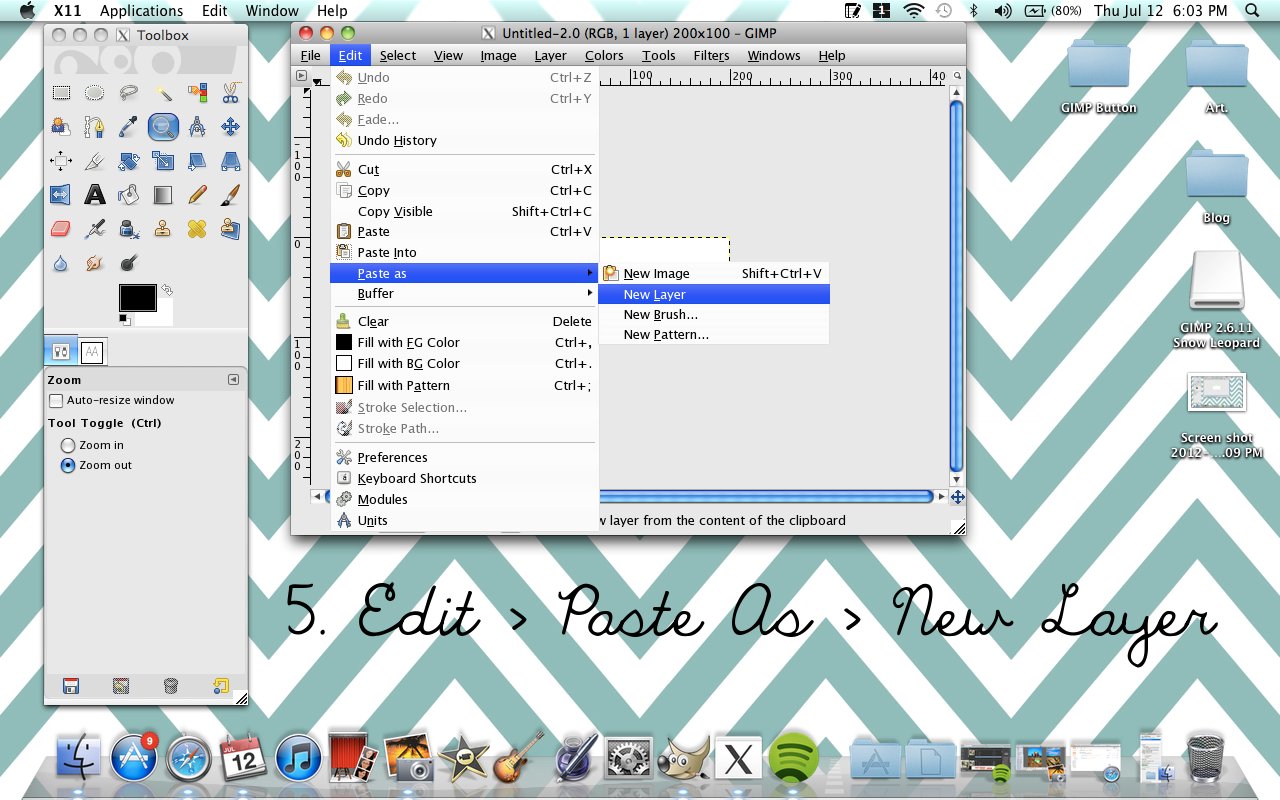
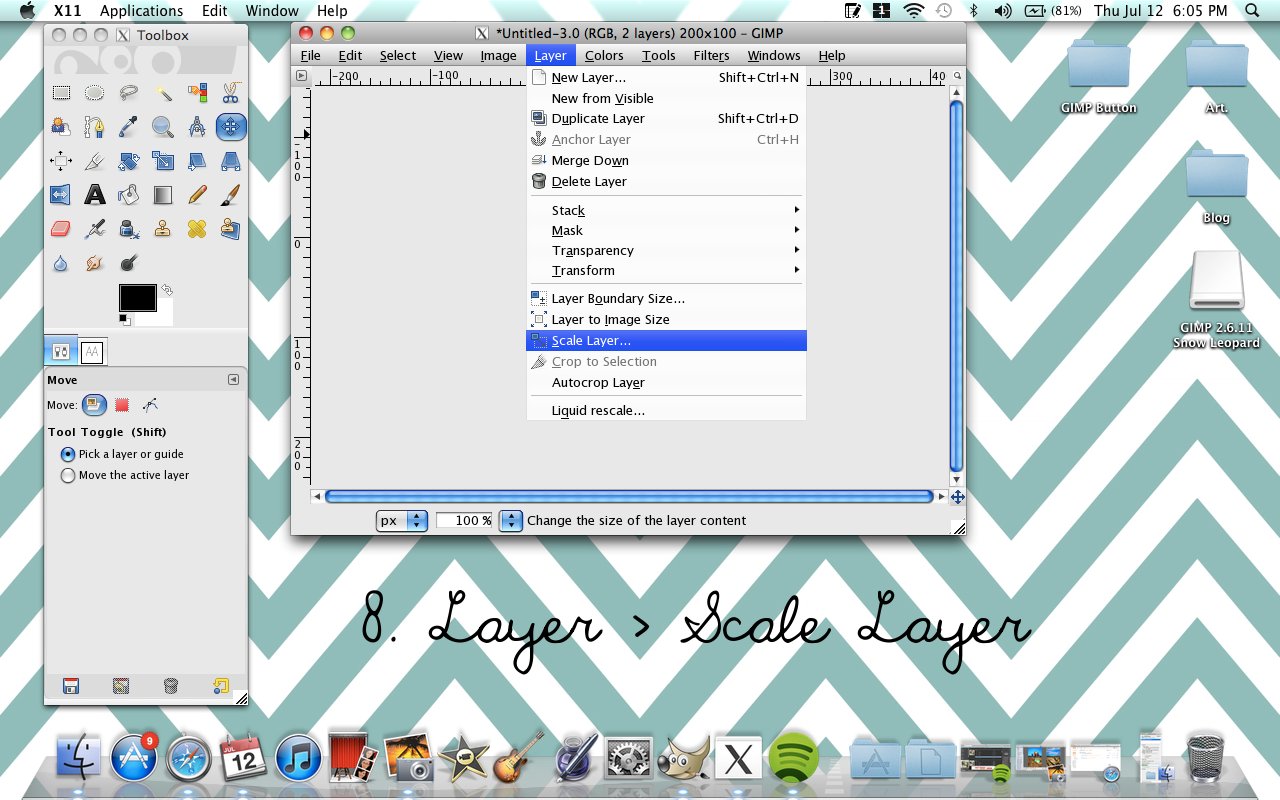
So now that you know what to do, lets talk about how to do it!
If you don't know how to add text. Click HERE!
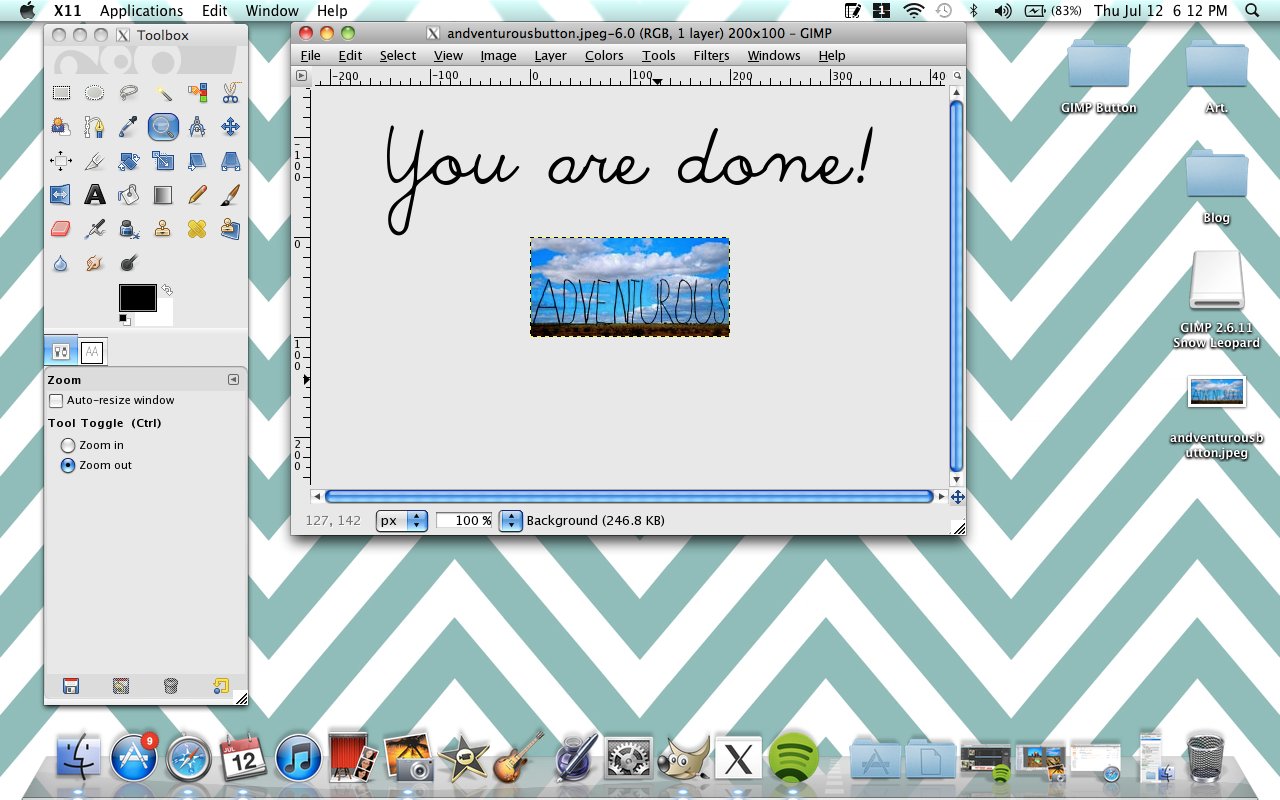
It really is very easy and quick! I have made a ton of different buttons and each time they get better and better! and I always have fun creating them. Don't forget that you can always add more elements to your button like clipart, cutouts, and designs. I put the imaginary "Adventurous" blog button up on my site just to see how it looks. 

Does it follow the rules?
1. Lost in the crowd? No it is easy to see!
2. Simple? Yes!
3. Is it interesting? Yeah!
4. Is it me? Well this doesn't really apply since it is an imaginary blog button... 

If you have any questions/comments please feel free to comment/email me! If there is anything that you want to learn how to do on Gimp please let me know! I am taking tutorial requests. As I have said before, in my previous GIMP tutorial posts, I am not at all an expert! I am still learning too! 

I would love to see what you create! or better yet let's swap buttons! I would love to support your blog! Just send me an email at carli.randolf@gmail.com

Carli


P.S. You can download GIMP (a free photo editing software) HERE. You can see my other GIMP tutorials on resizing and cropping images or adding text.

Gimp How-To: Adding Text


I am happy to share another installment of Gimp How-To! This time i'll be showing you how to add text to your photographs! Gimp is a free online software that is similar to photoshop but doesn't break the bank! You download it HERE! If you are new to Gimp and want to learn the basics, you have come to the right place! You can see my other Gimp tutorials on how to resize and crop images, that I did as a guest post on the blog What A Peach!, HERE

It really is quite simple. You just have to know what tools do what. I think that the most challenging part of Gimp is finding out what icons do what. 


Type your text into the box that appears on the right. To change the color of your text click on the color box in your "Text Tools" (the long black rectangle) and choose a color. The color box from the "tool box" (small black square) will not change the the color of your font.


You will probably need to resize your text again once you choose your font.

I wanted to separate my text so I created a text box for each word. Click on the "Mover Tool" to reposition your text. (Make sure to click on the actual text to move it. If you don't it will move the picture, not the text.)

I am NOT in any way an expert at Gimp. I am still learning too! I have spent many long hours creating my blog design and other graphics on Gimp, and let me tell you... it can be frustrating! Every time I use it, I get better and if you haven't noticed... my blog design gets better! Practice makes perfect! So if your looking to save a little time, a lot of stress, and want to know how to do anything that I haven't covered already or just you have a question feel free to comment or email (carli.randolf@gmail.com)  me and I can help! I am also looking for suggestions for up and coming Gimp Tutorials. So let me know what you need to know! 

Carli


Guest Posting

Happy Friday!
I thought I'd just let you know that I did a little guest post on my buddy Kit's blog What A Peach! It's a Gimp tutorial which is the first of a series! Kit was nice enough to let me kick off the series on her blog! Actually, she is the one that gave me the idea to do Gimp tutorials. So if you are having trouble with anything on Gimp then just send me an email with your problem and I can do a tutorial on it! I am so excited for the new things that are coming here at Sweet Dreams!

Carli

Oh, and you can see my guest post right HERE!